WebCampus grade integration with MyNEVADA

MyNEVADA offers instructors the ability to upload grades from WebCampus. This feature can make posting final grades in MyNEVADA easier and faster. The final grades are those that you see under the Total column in the gradebook of your WebCampus course. Before uploading your grades, follow the steps below to prepare your WebCampus course.

WebCampus-MyNEVADA integration tutorial

Watch this quick video to learn how to easily upload final grades from WebCampus to your grade roster in MyNEVADA.

Enable the grading scheme in WebCampus

Click Settings on your course menu, scroll down to Grading Scheme and check the box for “Enable course grading scheme.”

WebCampus settings page showing “Language,” “File Storage,” “Large Course,” “Grading Scheme” and “License” sections and associated options for each. Next to the “Grading Scheme” section, the option for “Enable course grading scheme” has been highlighted
[Figure 1] Screenshot of WebCampus settings page showing “Language,” “File Storage,” “Large Course,” “Grading Scheme” and “License” sections and associated options for each. Next to the “Grading Scheme” section, the option for “Enable course grading scheme” has been highlighted.

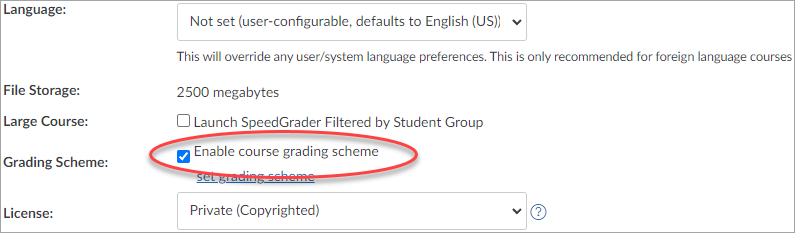
Click the set grading scheme link under the “Grading Scheme” section.

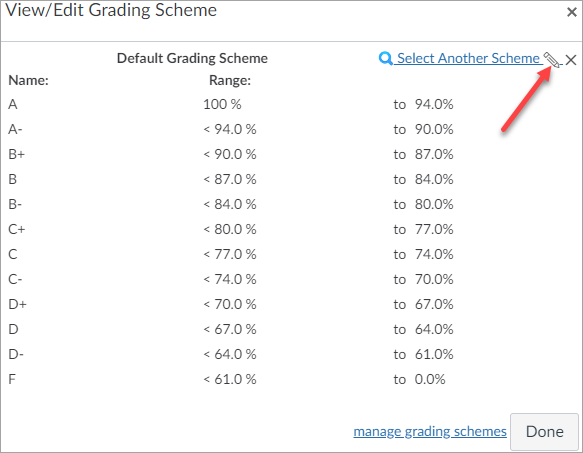
The View/Edit Grading Scheme window will open, containing the system default grading scheme. If the default grade scheme matches yours, click the Done buttonto confirm the settings. Otherwise, click the Edit Grading Scheme button, which looks like a pencil, at the top right to make your changes.

WebCampus “View/Edit Grading Scheme” window. The default includes a grade “Name” column and associated grade ranges. An arrow points to the Edit Grading Scheme button
[Figure 2] Screenshot of the WebCampus “View/Edit Grading Scheme” window. The default includes a grade “Name” column and associated grade ranges. An arrow points to the Edit Grading Scheme button.

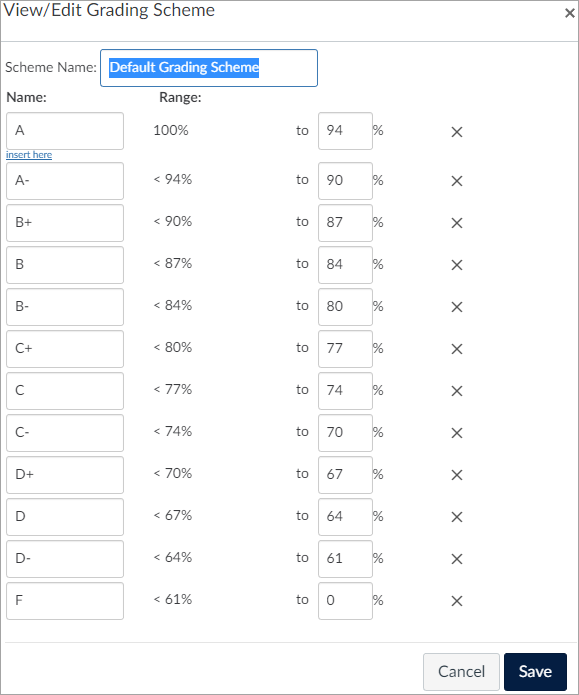
The Name and Range options will activate, allowing you to update your grading scheme. You can enter a new Scheme Name, adjust Grade Names (e.g., “A,” “B,” etc.) and change the grade ranges in the “Range” fields. After making adjustments, click Save.

Note that you can only use one grading scheme per course; if you have S/U grades for some students, you will have to manually change them in MyNEVADA. 

WebCampus “View/Edit Grading Scheme” window where users can enter a new Scheme Name, edit the grade names in the “Name” column and change the corresponding grade range in the “Range Column.” Clicking on a “Delete Row” icon will delete its corresponding row. “Cancel” and “Save” buttons at the bottom allow users to exit the grade scheme editor or save and move forward
[Figure 3] Screenshot of the WebCampus “View/Edit Grading Scheme” window where users can enter a new Scheme Name, edit the grade names in the “Name” column and change the corresponding grade range in the “Range Column.” Clicking on a “Delete Row” icon will delete its corresponding row. “Cancel” and “Save” buttons at the bottom allow users to exit the grade scheme editor or save and move forward.

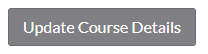
Click Done and you will be returned to “Course Details.” Don’t forget to click Update Course Details at the bottom of the page to save the changes.

"Update Course Details" button users should click after making updates to the grade scheme in WebCampus
[Figure 4] Screenshot of the “Update Course Details” button users should click after making updates to the grade scheme in WebCampus.

The grading scheme is now enabled and you will see the letter grades appear in the Total column of the gradebook.

Assign 0s to missing assignments

MyNEVADA pulls the total student course grade and not the current grade, which is what’s shown in the Total column. The calculated grade in the Total column excludes missing assignments with no grade. We recommend you enter a “0” for those without submissions, rather than leaving them blank. This will display an accurate grade to both you and your students.

If you haven’t already assigned 0s to missing work, hover over the column name, click the Column header menu and select Set Default Grade.

Gradebook column with the menu activated and Set Default Grade highlighted
[Figure 5] Screenshot of a Gradebook column with the menu activated and Set Default Grade highlighted.

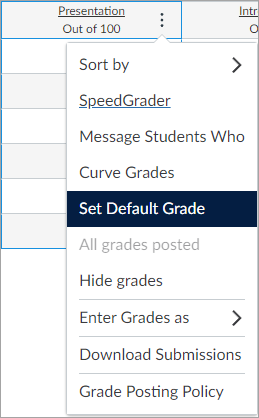
Enter a 0 in the field, click Set Default Grade and click OK on the window that opens. Repeat this step for all assignment columns.

Uploading WebCampus grades into MyNEVADA

Once you have enabled your grading scheme and entered 0s for missing work, you are ready to upload the grades to MyNEVADA. Below, review step-by-step instructions on how to complete the grade upload to your final grade roster in MyNEVADA.

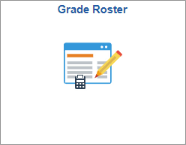
Access the Grade Roster in MyNEVADA

To do this, sign in to MyNEVADA and click on the “Grade Roster” tile/link from your Instructor Homepage.

Grade Roster tile found on the Instructor Homepage in MyNEVADA
[Figure 6] Screenshot of the Grade Roster tile found on the Instructor Homepage in MyNEVADA.

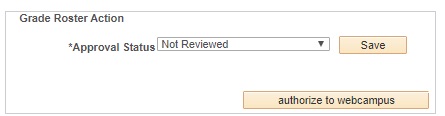
Authorize to WebCampus

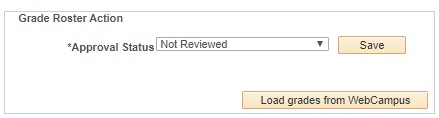
You should now see an “authorize to webcampus” button within the Grade Roster Action box in the Grade Roster. Click the authorize to webcampus button.

Grade Roster Action box in the Grade Roster section of MyNEVADA. Users may toggle options in a drop-down menu for “Approval Status” and click the authorize to webcampus button
[Figure 7] Screenshot of the Grade Roster Action box in the Grade Roster section of MyNEVADA. Users may toggle options in a drop-down menu for “Approval Status” and click the authorize to webcampus button.

You will then be redirected to the WebCampus log-in page. Log in to WebCampus using your NetID and password. The MyNevada/Canvas Grade Integration screen will be displayed. Click the Authorize button on the right-hand side of the screen.

MyNevada/Canvas Grade Integration screen in WebCampus. The text displayed reads “MyNevada/Canvas Grade Integration is requesting access to your account.” An Authorize button is highlighted to show users where to click to authorize the MyNevada/Canvas integration
[Figure 8] Screenshot of the MyNevada/Canvas Grade Integration screen in WebCampus. The text displayed reads “MyNevada/Canvas Grade Integration is requesting access to your account.” An Authorize button is highlighted to show users where to click to authorize the MyNevada/Canvas integration.

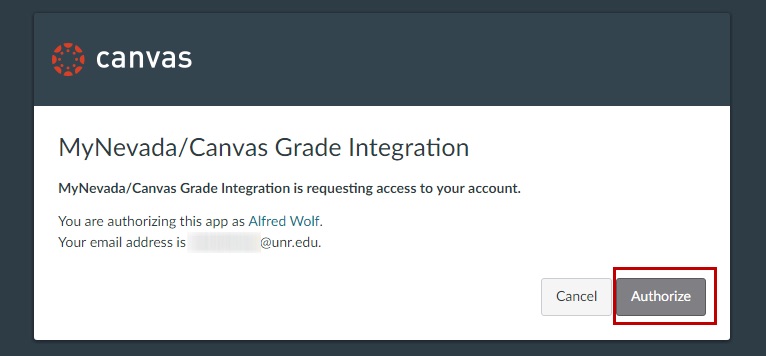
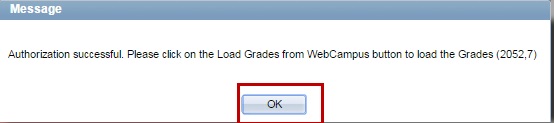
Once you have you Authorized you will be redirected to MyNEVADA and an Authorization successful message will be displayed, click OK.

authorization message in MyNEVADA after users authorize the MyNEVADA/Canvas integration. The Message window includes the message “Authorization successful. Please click on the Load Grades from WebCampus button to load the Grades (2052,7).” The OK button is highlighted where users click to finalize authorization
[Figure 9] Screenshot of the authorization message in MyNEVADA after users authorize the MyNEVADA/Canvas integration. The Message window includes the message “Authorization successful. Please click on the Load Grades from WebCampus button to load the Grades (2052,7).” The OK button is highlighted where users click to finalize authorization.

Upload WebCampus grades into MyNEVADA

You are now able to upload WebCampus grades into MyNEVADA. To use this feature, navigate back to the Grade Roster within MyNEVADA, choose the roster you wish to post final grades for and click Load grades from webcampus within the Grade Roster Action box.

Grade Roster Action box in MyNEVADA. Users can toggle the drop-down menu options for Approval Status and click Load grades from WebCampus to load their grades
[Figure 10] Screenshot of the Grade Roster Action box in MyNEVADA. Users can toggle the drop-down menu options for Approval Status and click Load grades from WebCampus to load their grades.

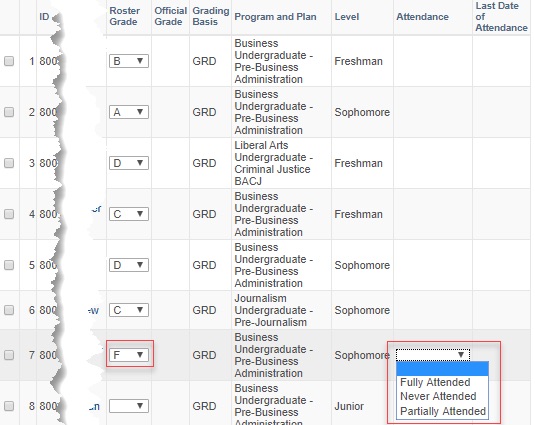
Once grades have been uploaded, they will auto populate into your grade roster within MyNEVADA. Any F’s issued will need to have attendance information updated in the “Attendance” column. If the student “Partially Attended,” the last date of attendance will also need to be entered in the “Last Date of Attendance” column.

course roster in MyNEVADA with columns for student ID, Roster Grade, Official Grade, Grading Basis, Program and Plan, Level, Attendance and Last Date of Attendance. The Attendance drop-down menu is activated for one student, showing users where to select the attendance information for students that receive an “F” in the Roster Grade column
[Figure 11] Screenshot of the course roster in MyNEVADA with columns for student ID, Roster Grade, Official Grade, Grading Basis, Program and Plan, Level, Attendance and Last Date of Attendance. The Attendance drop-down menu is activated for one student, showing users where to select the attendance information for students that receive an “F” in the Roster Grade column.

If a student added the course late or is listed on the Grade Roster but does not have a grade in WebCampus, you will receive an error message before being able to move the Grade Roster to approved and post. Click the OK button and manually enter the grades for any that may be missing.

If any of the students on the grade roster have changed their grading basis from Letter Grades to Satisfactory/Unsatisfactory, those grades will not be converted in the upload. You will need to manually select either S or U on the final grade roster, if left blank an error message will be displayed when you attempt to post the roster. If the student has changed their grading basis to Audit, they will automatically be assigned an “AD” grade.

[Figure 12] Screenshot of the course roster in MyNEVADA with columns for student indentification (removed for student protection), "Roster Grade" with drop-down menu with grade names, "Official Grade," "Grading Basis," "Program and Plan," and "Level." A red box highlights the "Official Grade" with an "AD" and "Grading Basis of "AUD" in one row and a blank "Official Grade" and "SUS" in "Grading Basis." 
[Figure 12] Screenshot of the course roster in MyNEVADA with columns for student ID, Roster Grade, Official Grade, Grading Basis, Program and Plan and Level. An Official Grade of “AD,” and a Grading Basis of “AUD” and of “SUS” is highlighted.

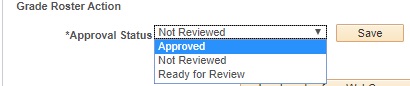
Once all grades have been reviewed, select Approved from the Approval Status drop-down menu under the Grade Roster Action box.

Grade Roster Action box in MyNEVADA with the Approval Status drop-down menu activated, with “Approved” highlighted. A Save button is next to the drop-down menu
[Figure 13] Screenshot of the Grade Roster Action box in MyNEVADA with the Approval Status drop-down menu activated, with “Approved” highlighted. A Save button is next to the drop-down menu.

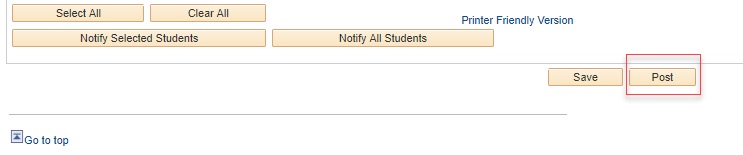
Once the roster status has been Approved, click the Post button to post all grades officially on the roster.

Post option in the Grade Roster in MyNEVADA with additional buttons, including Select All, Clear All, Notify Selected Students, Notify all Students and Save. The Post button is highlighted, where users can click to post their grades officially on the roster
[Figure 14] Screenshot of the Post option in the Grade Roster in MyNEVADA with additional buttons, including Select All, Clear All, Notify Selected Students, Notify all Students and Save. The Post button is highlighted, where users can click to post their grades officially on the roster. 

If you experience issues accessing MyNEVADA or your Grade Roster, please contact Admissions and Records (775) 784-4700 opt. 2 or email mynevada@unr.edu. If you experience issues with preparing your gradebook within WebCampus please contact the Office of Digital Learning office or email webcampus@unr.edu.