Best practices for PDF accessibility
PDFs are a widely used format for delivering instructional content. In order for PDFs to be accessible, they must be created or remediated with accessibility in mind. PDF generated from accessible source documents (Word, PowerPoint, InDesign) often require relatively little touch up to become accessible. Downloaded image PDFs and scanned documents need to have optical character recognition (OCR) performed to ensure that the text can be accessed and read by assistive technologies. Once text is available, it needs to be properly tagged and ordered to make sense for assistive technology users. Resources on how to create accessible PDFs are found below.
- Converting a PowerPoint presentation to an accessible PDF
- Options to avoid scanned documents
- Checking and Remediating PDFs for accessibility
- Request Adobe Creative Cloud for Education (includes Acrobat Pro) from OIT
Converting PowerPoint to an accessible PDF
You may have a very accessible PowerPoint presentation, but there are some specific actions that you must take to ensure the accessibility features are transferred when converting to PDF.
To save your PowerPoint slides in PDF format (this is one of several methods):
Step 1: Click File, then select Save As and then indicate where to save the file and type a name for the file (if needed).
Step 2: Below the File name field, click the Save as type field to open the list of options and choose PDF.
- NOTE: for more recent versions of Office (Office 365, Office 2019 and later) you may need to click “More Options” under the file type field to see the full dialog.
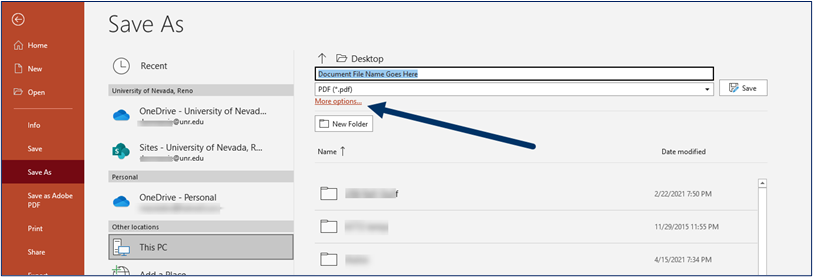
Step 3: After you have specified PDF as the file type, an Options button will appear.
Step 4: Click Options and be sure to check the box next to Document structure tags for accessibility.
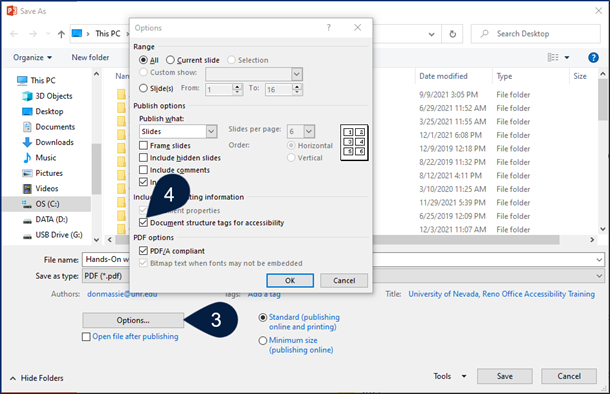
Step 5: Click OK, then click Save.
NOTE: Never use the print menu to create a PDF intended to be accessible (via clicking File, then Print, then choosing PDF instead of selecting a printer). This creates an inaccessible image as the PDF.
To save your PowerPoint as notes pages, handouts or an outline in PDF format:
Step 1: Click File, select Save As, and then indicate where to save the file and type a name for the file (if needed).
Step 2: Below the “File name” field, click the Save as type field to open the list of options and choose PDF.
- NOTE: for more recent versions of Office (Office 365, Office 2019) you may need to click More Options under the file type field to see the full dialog.
Step 3: After you have specified PDF as the file type, an “Options” button will appear.
Step 4: Click Options and be sure to check the box next to “Document structure tags for accessibility”.
Step 5: Use the drop down arrow next to the “Publish what” field to select handouts, notes page, or outline. If selecting handouts, options to specify the number of slides per page and orientation will become active. Select options based on your preferences.

Step 6: Click OK, then click Save.
NOTE: Never use the print menu to create a PDF intended to be accessible (via clicking File, then Print, then choosing PDF instead of selecting a printer). This creates an image of the PDF, which is inaccessible.
Options to avoid scanned documents in PDF format
Scanning a document creates an inaccessible image, so scanning should be avoided whenever possible. The following are tips for better alternatives and remediation options for specific types of documents:
Journal content
Linking to journal articles may improve options for access. Journals are increasingly making content accessible in HTML format online and they often include an option to download a PDF version, which may be a scanned document or image-only PDF. Although people have downloaded and used PDFs for many years, using solely the downloaded PDF may create barriers for students who could benefit from using the HTML version, which is often much more accessible. When an instructor downloads journal content and makes it available only via the “Files” area in WebCampus, it doesn’t allow for using the HTML version.
Linking to the journal article allows students to choose whether to read it online (HTML or PDF) or to download and/or print it if they wish. Subject matter librarians can assist determining if we have access to the journal and if a permalink can be generated so that the content can be accessed both on and off campus.
Hand-written materials
Some instructional material comes in the form of hand-written notes, etc. If/when this content can be converted to text, it is far more accessible. In some disciplines, this can be nearly impossible to do, and scanning may be the best way to make it available to students. Contact the Teaching & Learning Technologies, Instructional Design and Educational Technology team (tlt@unr.edu) for guidance about how to make students aware of potential accessibility limitations and options for obtaining support.
Documents with a digital source
When the source file for a document is available, it’s recommended to add as much accessibility support to the source material and provide it in the source format (e.g. Word, LaTeX if students in the course know LaTeX, etc.) or convert to PDF and make the PDF as accessible as possible. Printing and then scanning one of these documents or choosing “Print” and selecting PDF as the printer, which generates an inaccessible image, should be avoided.
Copies of documents where the is no digital source
For some documents, there is no digital source or it has been lost. In many of these cases, a PDF version of the document can be made more accessible using Adobe Acrobat Pro (also called Acrobat DC). You will need a copy of Acrobat Pro because PDF remediation for accessibility cannot be done with the free Adobe Acrobat Reader.
Checking and Remediating PDFs for accessibility
Currently, creating accessible PDFs requires considerable knowledge of how content is structured (tagged and ordered) in a PDF, and attending training is strongly encouraged. PDFs are designed to be print media, but we’re increasingly reading PDFs online, and therefore there is a need to make them accessible. Adobe is doing great work making Acrobat Pro capable of performing this work, but it’s a detailed and continually changing process, so any instructions listed here may quickly become out of date. Please attend training so that you can learn the latest techniques and have any specific questions answered.
Accessible PDFs will have the features listed below. If what you read here seems foreign to you, we recommend attending a PDF Remediation for Accessibility training, available from Teaching & Learning Technologies (TLT) Digital Accessibility Training Sessions page.
- The initial view is set to the document title and not the file name.
- To set the title, go to File, then Properties, then enter the appropriate title in the Title field under the Description tab.
- Setting the initial view to display the title can be done in a couple of ways:
- Go to File, then Properties, then the Initial View tab and change the Show setting from File Name to Document Title.
- Run the Accessibility Check feature from the Accessibility tool. If the title fails, right click and select Fix. The document will automatically display the title entered per instructions in the first bullet for this section.
- Document language is specified.
- If using the Make Accessible feature from the Action Wizard, you will be prompted to specify the document language.
- If using any other approach, run the Accessibility Check feature from the Accessibility tool. If the language fails, right click and select Fix and you will be prompted to specify the document language.
- Tagging structure falls under a document tag.
- If all content is NOT nested under a <Document> tag, right click Tags at the top of the Tags tree, choose New Tag and click the dropdown arrow in the Type field. Choose Document. The field for Title is optional, and typically unnecessary. Next, nest the <Document> tag directly under Tags, then select all the tags (use Shift key to select en masse) and nest the content under the <Document> tag.
- Document has headings, and headings are used properly.
- Follow web accessibility best practices for heading structure. The Reading Order tool in the Accessibility toolset can be used to specify a heading level.
- Alternatively, you can right click an existing tag, select Properties and use the dropdown arrow in the Type field to choose the appropriate heading level.
- Follow web accessibility best practices for heading structure. The Reading Order tool in the Accessibility toolset can be used to specify a heading level.
- All figures/images have a text equivalent (also known as image descriptions or alternative text).
- To tag visual elements as Figures, use the Reading Order feature from the Accessibility tool, right click on the figure tag and select Edit Alternate Text. Type the appropriate alt text in the Alternate Text field and choose OK.
- Alternatively, you can run the Accessibility Check feature from the Accessibility tool. If it shows “Figures alternate text – Failed,” drill down to each failed image, right click and select Fix. You will be prompted to specify the alt text in the Alternate Text dialog box that appears. Click Save & Close when done.
- NOTE: do not select the “Decorative figure” checkbox to background/artifact an image in this dialog box. This feature DOES NOT currently work as well as it should (Adobe is aware).
- To tag visual elements as Figures, use the Reading Order feature from the Accessibility tool, right click on the figure tag and select Edit Alternate Text. Type the appropriate alt text in the Alternate Text field and choose OK.
- Content is tagged properly by content type (paragraphs, lists, links, etc.).
- Learn how to change content types as needed using the Reading Order feature in the Accessibility tool and/or manually adjust tags via right clicking existing tags, selecting Properties and selecting the appropriate tag type.
- Table content has headers specified and the scope set.
- Do NOT simply change table data cells <TD> to table heading cells <TH> in the tagging structure under their respective table rows <TR>, which are nested under the table <Table> tags – this will not specify the scope.
- Learn to use the Table Editor using the Reading Order feature in the Accessibility tool so you can access the Table Cell Properties. This is where you can specify the appropriate scope, adjust the row or column span for merged cells, and specify cell to header associations for tables with multiple levels of heading and merged cells.
For hands-on instruction on how to accomplish these techniques, sign up for our PDF Remediation for Accessibility workshop at the TLT Workshops and Training page.