Microsoft PowerPoint accessibility tips
Creating accessible Microsoft PowerPoint presentations is relatively easy once you know what is required. PowerPoint also has a real time accessibility checker that will alert you to errors and provide accessibility warnings and tips.
- Using the accessibility checker in Microsoft PowerPoint
- Bulleted and numbered lists in Microsoft PowerPoint
- Image descriptions - also known as alternative (alt) text
- Table accessibility in Microsoft PowerPoint
- Accessible hyperlinks: Descriptive links in Microsoft PowerPoint
- Creating accessible PDFs from your PowerPoint presentations
Accessible PowerPoint presentations should have the following features:
- Unique titles for every slide
- Properly formatted lists
- Image descriptions (alt text) for all non-textual/graphical elements
- Tables with header columns and rows (if present) specified
- Descriptive hyperlinks if intended for online delivery
Using the accessibility checker in Microsoft PowerPoint
The PowerPoint accessibility checker indicates errors and warnings for items that may affect understanding or functionality for users with disabilities and provides and tips for making additional accessibility improvements.
PC
Older versions (some versions of Office 2019 and prior):
Step 1: Click File.
Step 2: Click the Check for Issues button and select Check Accessibility.
Recent versions (Office 2019 and more recent, Office 365):
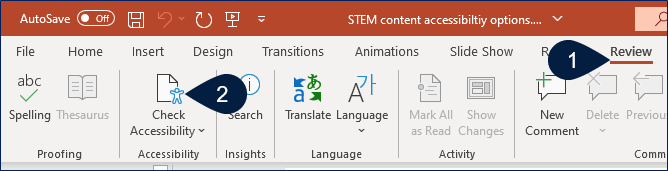
Step 1: Click the Review tab.
Step 2: Click Check Accessibility in the “Accessibility” group.
Once the accessibility checker is active, you can click on the listed items to gain more information about the errors, warnings, and tips and where they occur in the document.
Mac
Step 1: Click the Review tab.
Step 2: Click Check Accessibility.
Once the accessibility checker is active, you can click on identified items to gain more information about the errors, warnings, and tips and where they occur in the document.
Bulleted and numbered lists in Microsoft PowerPoint
Bulleted and numbered lists help break up long passages of text by organizing key content or procedures into meaningful points or procedural steps. They provide variety, which prevents reading fatigue, and they allow users to quickly identify the key points.
Sighted users scan a document visually to find list information. When lists are created properly, assistive technology users can find and navigate directly to a specific list within a document. If lists are not created properly (e.g. asterisk symbols followed by tabs), assistive technologies treat them no differently than normal text, essentially burying them in surrounding text, which makes them difficult to find and navigate.
List options exist under the “Home” tab, in the “Paragraph” group. Type the content you would like to make into a list, then highlight it and click either the bulleted list icon or the numbered list icon to add a generic bullet or number to each item. Click the dropdown arrow beside any type of list for additional bullet style options and/or to customize the numbering level or format.

You can also click a bulleted or numbered list icon and then start typing your list. When you reach the end, click the list icon again to toggle it off. Placing the cursor at the beginning of a list item and backspacing or clicking the list icon will remove a bullet or number. Using the “Increase Indent” or “Decrease Indent” icons (or Tab/Shift + Tab) from the “Paragraphs” group allows you to create and control the appearance of a multi-level list.
Image descriptions – also known as alternative (alt) text
Alt text is announced to an assistive technology user to convey contextual information about images and other graphical content. Alt text is a brief description; it is not intended to describe every aspect of an image, just what is contextually relevant.
Graphical content can convey important information. Making this information available to people with vision impairments provides an equitable experience, allowing them to understand the same message that sighted people infer from an image.
Tips:
- Provide alt text for all non-textual content, including the following:
- Images (photographs, graphic art)
- Charts and graphs
- Text boxes when the text is not accessible to assistive technologies (e.g. if created in PowerPoint and you will be converting to PDF).
- Alt text should be succinct - state just what is contextually important.
- Assistive technologies default to certain character counts and automated checkers will often flag alt text as being too long if it is over 100-160 characters (depending on the tool).
- If there is a lot to say about a graphical item, it's best to include it in adjacent document text - the visual can support the message.
- Avoid using text within images when possible.
- Text in images often creates a need for lengthy alt text.
- Accessibility checkers sometimes require all text in the image to be included as alt text in order to pass validation.
- There's no need to repeat information that is located in nearby text or a caption.
- You don't need to state that an item is a graphic or image.
- The screen reader will inform the user that graphic content exists.
- For logos, however, it's often more important to state that it's a logo (e.g. it would be more important to know that the Coca Cola logo is on the page than knowing the font, colors, and design of the logo).
- Purely decorative images (e.g. banner art, etc. with no contextual value) can be marked as "decorative" so that assistive technologies will skip over the image entirely.
Older versions (Office 2016 and prior– PC and Mac):
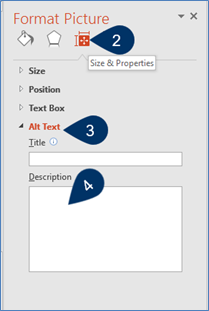
Step 1: Right click an image, shape, table, etc. (control + click on Mac) and choose Format (Picture/Shape/Object, etc.) depending on the type of content.
Step 2: The “Format” (Picture/Shape/Object name) sidebar will appear. Click on the Size & Properties icon at the top of the sidebar.
Step 3: Select Alt Text.
Step 4: Type the alt text in the Description field. The “Title” field is optional.
Note: There is currently no option to provide alt text for a table in PowerPoint.
Recent versions (Office 2019 and more recent, Office 365– PC and Mac):
Step 1: Right click on the image, object, Word Art, Smart Art, etc. (control + click on Mac).
Step 2: Select Edit Alt Text.
Step 3: Type the alt text in the field that appears.
- Change from the file name of image, if shown, to something that describes the contextual purpose of the item to people who may not see it well or at all.
- If using “Generate alt text for me,” ensure it describes what is contextually relevant about the image.
Step 4: If an image has no contextual value, select Mark as decorative and assistive technologies will not indicate an image/object is present.
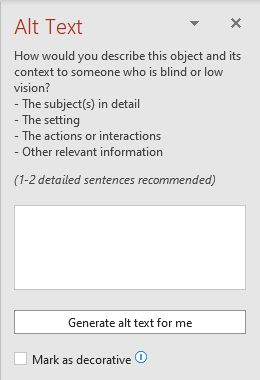
Table accessibility in Microsoft PowerPoint
Assistive technology users can locate information and understand relationships more efficiently when data tables are provided with accessibility supports, particularly column and row headings.
Tips:
- Provide and identify table headers to aid navigation.
- Column headings indicate the purpose of columns; row headings, when present, indicate the purpose of rows.
- Sighted users and those who use assistive technologies will both be able to better understand the reason why specific items are oriented in a column or row.
- Headers ease the cognitive load because screen reader users don't have to remember which column and row they are in -- headers provide semantic cues.
- Avoid leaving empty headers.
- Blank data areas in tables can be sources of confusion if it's unclear whether or not data is missing.
- Provide a caption.
- Users can quickly identify the purpose of a table.
- Provide alternative text (also called a table summary).
- Assistive technology users can decide whether to read the table content or skip to a different section in a document.
- Alt text is often similar to a table caption, but because captions are often placed below tables they may not be read until after the information is desired. Alt text is read first and allows screen reader users to decide if the information is important to their needs so they can skip elsewhere if desired. If there is a caption or heading above the table, alt text is less important.
- Avoid merged/spanned cells and multiple header levels when possible.
- Screen readers can operate in a more predictable fashion (top to bottom, left to right).
- Remediating PDF tables for improved accessibility is more efficient when there are no merged cells or multiple levels of headers.
How To Create Accessible Tables in PowerPoint (PC and Mac):
Step 1: From the Insert tab, use the Table button to select a desired number of rows and columns.
Step 2: After setting up your table cells, click anywhere in the table. The Table Tools Design tab will appear (called just Table Design on Mac).
Step 3: Click Table Design (for PCs, skip to step 4 for Macs).
Step 4: Use the proper way to identify headers based on your table layout.
- Single row of column headers (across the top):
- From the Table Style Options group (group is not named on a Mac), check the box next to Header Row.
- Row headers (down the first column):
- You can only identify row headings in the first column. To do so, select the check box next to First Column.
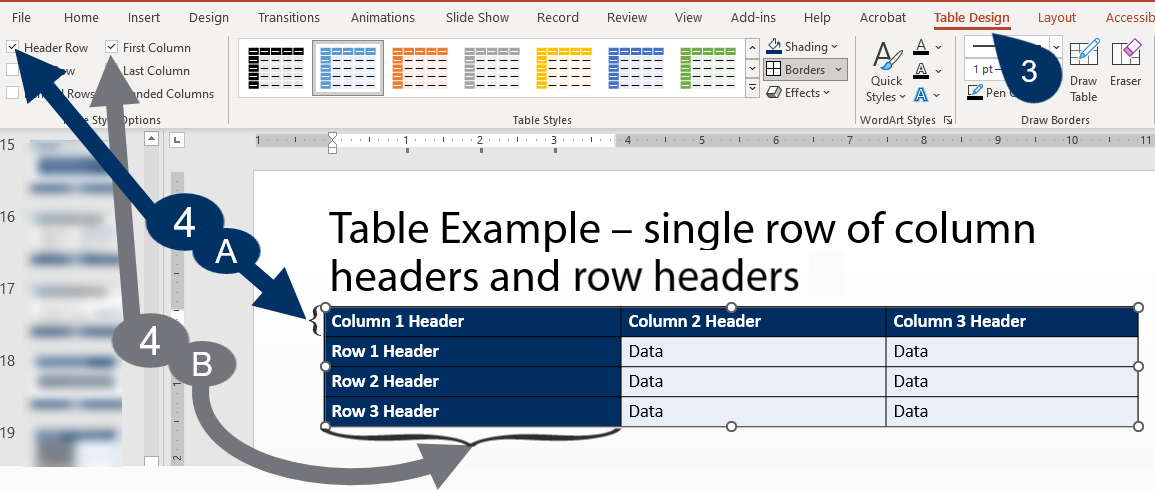
[Figure 5] Screen clipping of PowerPoint Table Design with a pointer numbered 3 indicating the location of the Table Design tab and pointer 4A indicating the location of the header row checkbox and Pointer 4B indicating the First Column checkbox.
- You can only identify row headings in the first column. To do so, select the check box next to First Column.
- Multiple rows of column headers: Not possible to indicate
- Unfortunately indicating multiple rows of column headers is not possible in PowerPoint (this can be done to a PDF, if converting to PDF). The feature in Word is called “Repeat as header row at the top of each page” and PowerPoint uses slides and not pages; a table cannot stretch between two slides in PowerPoint.
Step 5: Provide alt text for the table if possible (not possible in all versions). This is particularly important if there is no caption or heading above the table.
- Right click (control + click on Mac) anywhere within the table and choose Format Shape.
- Select the “Size & Properties” icon under the “Shape Options” group.
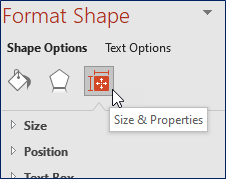
[Figure 6] Screen clipping of the Format Shape dialog box with the cursor arrow hovering over Size & Properties showing the tool tip text. - Click the arrow beside Alt Text and type the alt text in the Description field (the “Title” field is optional). The alt text should be a brief summary of what the table is about.
Step 6: Click OK.
Accessible Hyperlinks: Descriptive Links in Microsoft PowerPoint
Descriptive links are hyperlinks that appear as meaningful text rather than a long string of characters. Assistive technology users can choose settings that read all links on a page before reading content; it’s helpful to know where the links lead without having to click each one. If descriptive links are used instead of a lengthy URL or meaningless link text such as “more info” or "click here,” users can determine whether or not they want to click the link.
How to create accessible hyperlinks in PowerPoint (PC and Mac):
Step 1: Type a phrase that describes what information the user will access or why they should click a link.
Step 2: Highlight the text to be used as a descriptive link.
Step 3: Creating the link can be done in several ways:
- Select the link icon in the “Links” group under the Insert tab.
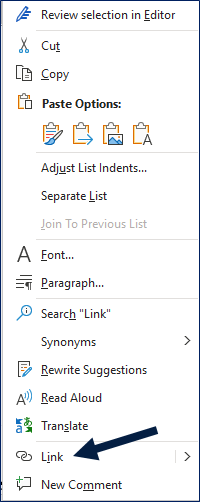
- Right click (control + click on Mac) highlighted text and select Link.
Step 4: A dialog box will open. The “Text to display” is often shown along with a text entry field where you can paste or type the URL.
Step 5: Click the OK button.
Creating accessible PDFs from your PowerPoint presentations
Please see the following guidance on best practices for creating PDFs from PowerPoint: