Remediating scanned documents
Remediating for accessibility is more efficient when starting with a digitally generated document. The ideal situation is to start with a source document that was saved as a PDF in the proper format with accessibility features, such as tagging and using headings as bookmarks. If the source is a scanned document that is saved/converted to a PDF, the workflow is much more difficult.
How to check if PDF text is accessible
First, determine if the PDF document was generated from digital text or a scanned image of text. A scanned image of text is not accessible and will need to have optical character recognition (OCR) applied. There are two processes to indicate whether the text will be accessible by screen readers: clicking on the document or trying to select text.
Option A: Click on the document
Often, the easiest way to check for text is to click on the document to see if text or the entire page highlights. With document open in Acrobat Pro, click anywhere in the document. If the entire page highlights, it is likely a scanned image. If a cursor appears, the PDF document contains text.
Option B: Try to select text
An alternate way to test for text within the PDF is to try to select all the text. From the top Acrobat navigation menu, click "Edit" and then click "Select All."
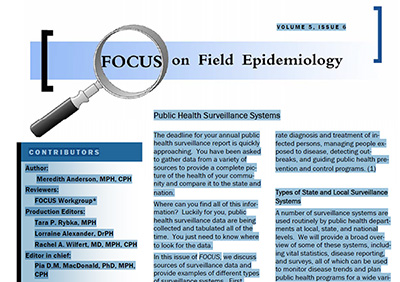
Highlighted text elements. If the textual elements highlight, the document contains text. (See Figure 1)
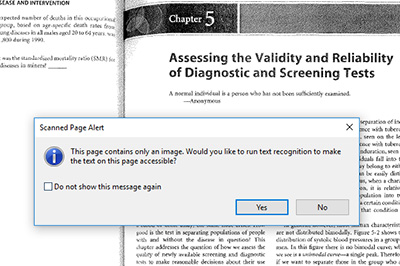
If "Select All is not active." If Select All is not active (this happens if a document that is an image is already selected/highlighted or if you have launched a particular tool), click "Edit" and then click "Edit Text and Images"). Or, when you click "Select All," a Scanned Page Alert box appears, you know that the document does not contain text. The alert box will immediately prompt you to decide whether to run text recognition. (See Figure 2 for screenshot example)
How to create editable text in Adobe Acrobat
When creating editable text, the process begins with running text recognition. If you checked for the presence of text and the "Scanned Page Alert" box appears, click the "Yes" link to run text recognition.
How to manually run text recognition
To manually create editable text, do one of the following:
- From the Acrobat menu, click "Edit" and then click "Edit Text & Images"
- Click "Edit PDF" from the tools pane (right side of screen by default) and you will be prompted to start text recognition
Set language and recognition parameters
Once you give the approval, the text recognition process, "Optical Character Recognition (OCR)" will start immediately. Depending on whether you launch the process from the alert box or manually, it may prompt you whether to use English as the document language either before or after the text recognition process completes.
The manual process automatically converts the document to editable text and images.
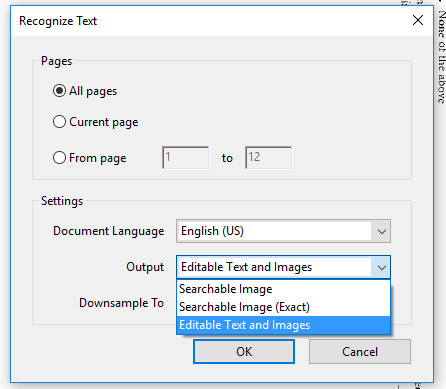
If you use the process via the alert box, you may also select which pages to recognize text for, output settings and down sampling size.
- Use the default settings for All pages
- Select the appropriate language
- Set Output to Editable Text and Images
- Leave the Down sample To setting at the default, which is the highest setting
See Figure 3 for screenshot example of the Recognize Text alert box.
Verify accuracy and edit textual errors
If your source material is a scanned document (no selectable text), you must perform optical character recognition (OCR) to convert the image to editable text. Acrobat Pro does a nice job of identifying text in the document, but it will almost never be perfect. Text that appears stretched often will not be identified, and text in images, charts and graphs is often incorrect.
Options for correcting scanned document issues
Once the OCR process is complete, you'll need to review the end product and correct any mistakes. There are two options:
- Exporting the document and resaving
- Using Adobe Acrobat's read out loud and edit tool
Option 1: Export to Microsoft Word, correct issues and re-save as a PDF
This option may be the easiest way to correct textual errors, particularly if the scanned document is long or will obviously produce recognition issues (e.g., smudged text, bent words near the interior spine of the book, etc.). Follow the steps below to export and re-save your document.
Step 1: Click "File." Click "Export To." Click "Microsoft Word." Click "Word Document"
Step 2: Select a destination for saving the Word document, then click "Save."
Step 3: Open the saved word document (preferably with the PDF open on another monitor screen), then visually compare the documents and correct any mistakes.
Step 4: Save the Word document as a new PDF file.
- Click "File" and then "Save as Adobe PDF." Click "Options" and make sure to click the following checkboxes: "Enable Accessibility and Refleow with tagged Adobe PDF" and "Create Bookmarks" and then click "Convert Word Headings to Bookmarks." Click "OK" and then enter a file name that allows you to distinguish the revised file from the original and then click "Save."
Option 2: Use Adobe Acrobat's "Read Out Loud and Edit" option
This feature allows you to work with from the PDF directly. It can be a great solution for short documents with a clean looking scan, but it can be difficult to use for long documents or documents with many errors.
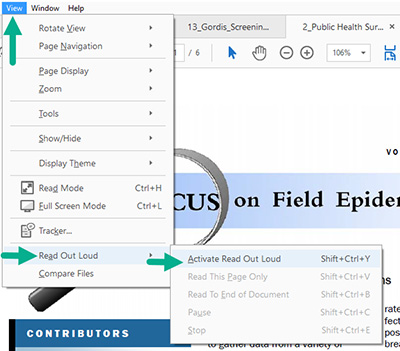
Step 1: From the Acrobat menu bar, click "View" and then "Read Out Loud" and finally "Activate Read Out Loud" to enable the reader. (See Figure 4 for screenshot example)
Step 2: Return to "View" and choose whether to "Read This Page Only" or "Read To End Of Document." Using this same "View" and then click on :Read Out Loud" menu while the read out loud tool is working will permit you to pause/resume and stop the voice over.
Step 3: Click "Edit." Click "Edit Text & Images," and use Adobe Acrobat's editing functions to remediate any erroneous text.
The Adobe Acrobat text editing process is not covered here, but a web search can help.