Using Kaltura Capture
Kaltura Capture tutorial
Learn to use Kaltura Capture application to create recordings.
Kaltura Capture is a free application that allows you to record your webcam, desktop or both. Kaltura Capture is available to faculty and students via My Media WebCampus. Follow the instructions below to download and start using Kaltura Capture, or skip to a section using the following links:
Downloading the Kaltura Capture app
Using the Kaltura app to record
Downloading the Kaltura Capture app
The first time that you want to use the Kaltura Capture app you will need to download it. Follow the steps below to download the application and install on your computer.
Step 1: Log in to WebCampus.
Step 2: Browse to one of your courses (for the purpose of downloading the app it does not matter which course).
Step 3: Click on My Media. Note: My Media will be located on the course menu in WebCampus. If you do not see it on your course menu, you will need to enable it through your course settings.
Step 4: From My Media, click on the Add New drop down and select Kaltura Capture.
Step 5: On the following page, click the download button for the appropriate version (Windows or Mac).
Step 6: Save the installer file to your computer and run installation program once it has downloaded.
Step 7: You should now have the Kaltura Capture app on your computer.
NOTE: The first time you want to use the app after installation, you will need to launch it from My Media in WebCampus. After the first launch, you will be able to record directly from the app without going into WebCampus.
Using the Kaltura Capture app to record
Now that you have installed the Kaltura Capture app, you can use it to record your desktop, webcam or both. As noted previously, the first time you launch the app it must be done from WebCampus>My Media>Add New>Kaltura Capture. After this you can launch the app directly from your PC.
Step 1: Go to All apps>Kaltura Capture>Kaltura Capture and select “Kaltura Capture” to open the app.
Step 2: When you launch the software the recording bar will open.
NOTE: Kaltura Capture will open to the last interface that was used, so if you were last in the library view, Kaltura capture will open to library view and likewise, if you were in the recording bar view, it will open in the recording bar view. If you are in library view, click the red New Recording button to toggle to the recording bar.
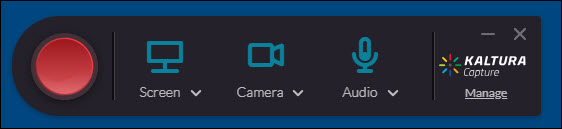
Step 3: Click on the:
- Camera icon to toggle your webcam on/off and use the drop-down to choose which webcam to use (if you have multiple options).
- Monitor icon to toggle desktop recording on/off and use the drop-down to choose which desktop to record (if any) – if you only have one monitor you will only be able to toggle this on/off.
- Microphone icon to select which microphone you would like to use. You can get to additional settings by clicking on the Manage link located below the Kaltura Capture logo. See the settings section for additional information.
NOTE: If using the “Select Area” option for recording your screen, it is strongly recommended that you use on of the presets provided (1024x768, 1280x720, 1280x1024 ), this will preserve the aspect ratio of the video and ensure it looks appropriate when you have completed your recording.
Step 4: When you are ready to record, click on the record button to start the recording.
Step 5: While you are recording, the recording bar will be smaller and allow you to stop, pause or cancel your recording - as well as providing a counter so you know how long you have been recording.
Step 6: Once you have completed the recording, click on the Stop button (square icon) to stop the recording.
Step 7: In the pop-up window that opens, verify you would like to stop the recording by clicking on the “Yes, Stop it”
Step 8: The “Entry” page for your recording will open in the Kaltura Capture app. At this point you can enter a title for your recording, add a description and tags. When you have entered all of the relevant information, click on Save and Upload to upload the video to My Media in WebCampus.
Step 9: The video will now be uploaded to WebCampus and you will be directed to your Library in the Kaltura Capture app. You can start a new recording by clicking on New Recording at the top of the window.
Step 10: The video will now be available in My Media for deployment to your courses in WebCampus.
NOTE: The local copies of the recordings will be saved to the following locations on your computer:
- Windows: C:\Users\[your user name]\AppData\Local\Kaltura\Capture\Recordings
- Mac: /Users/[your user name]/Library/Preferences/Kaltura/Capture. (You may need to “un-hide” the folders to view the files.)
Adjusting the settings in Kaltura Capture
Step 1: Launch Kaltura Capture on your computer.
Step 2: Kaltura Capture will open to the last interface that was used, so if you were last in the library view, Kaltura capture will open to library view and likewise, if you were in the recording bar view, it will open in the recording bar view. If you are in the recording bar view click Manage if not proceed to the next step.
Step 3: From the library view, click on the gear icon on the left-hand side of the window.
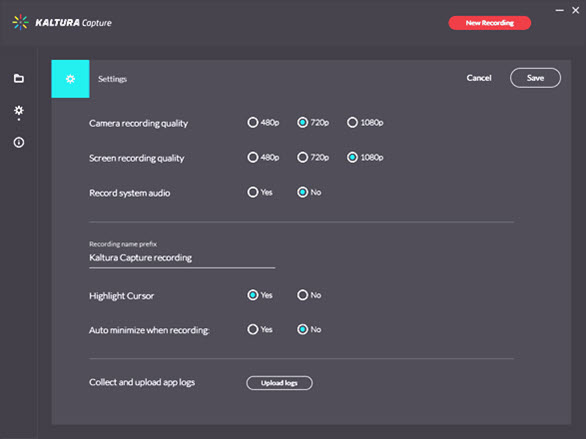
Step 4: You will now be in the settings area. You can adjust the camera and screen recording quality as well as toggle system audio recording on/off. Additionally, you can change the default recording prefix for your files.
Step 5: Click the Save button to save any changes you made (or Cancel to abandon any changes).
NOTE: The links that appear near the videos in the library view will take you to MyMedia - but you must be logged into WebCampus for these links to work. Do not share these links as they will not work for others.