Transferring Zoom recordings to My Media
Downloading and transferring Zoom recordings
Learn how to transfer your recorded Zoom sessions to My Media in WebCampus.
Transferring a Zoom Cloud recording
Any Zoom cloud recordings that you plan to keep after the current term should, ideally, be transferred to your My Media in WebCampus. We have limited cloud storage with Zoom and the storage in My Media does not have the same limits.
Step 1: Log in to WebCampus and browse to your course.
Step 2: Click on Zoom in the left-hand course menu.
Step 3: On the Zoom page, click on the Zoom Recordings tab.
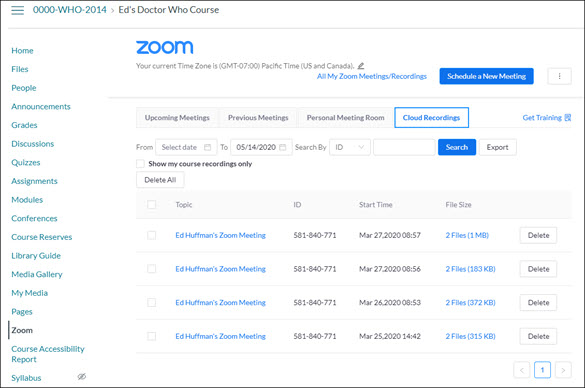
Step 4: Click on the title of the recording you want to transfer to My Media.
Step 5: On the Recording Details page, click on the Download link under the Recording-1 (or similar) thumbnail (not audio only).
Step 6: Select a location on your computer to save the file.
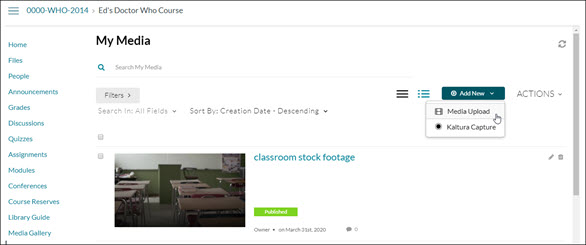
Step 7: Now, click on My Media in the left-hand course menu. (If My Media is not in your course menu it will need to be enabled.)
Step 8: On the My Media page, click on the Add New drop-down menu and select Media Upload.
Step 9: On the Upload Media page, use the Drag and Drop area to add your video files or click the “+ Choose a file to upload” button and browse for your file.
Step 10: The next page will show you the upload progress and allow you to edit the Name, Description (optional) and Tags (optional) for the file. You can choose to keep the video Private or Publish it to one or more of your courses.
Step 11: Click the Save button to continue. (You do not need to wait for the upload to complete to click the Save button, but you will need to remain on the page until the upload is complete.)
Step 12: Once the video has finished uploading and has been saved, you will receive a banner message and links to “Go to Media” and “Go to My Media” will appear adjacent to the Save button. Click on the “Go to My Media” link.
Step 13: Your video should now appear in your media list in your My Media area. It will likely show an “in-progress” image until it has been encoded and is ready to be viewed.
Transferring a Zoom local recording
Zoom content that has been recorded to locally to your computer (rather than to the cloud) can be downloaded and transferred to your My Media area. Doing so allows you to request captioning and make the content available to your students.
Step 1: Log in to WebCampus and browse to your course.
Step 2: Click on My Media in the left-hand course menu. (If My Media is not in your course menu it will need to be enabled.)
Step 3: On the My Media page, click on the Add New drop-down menu and select Media Upload.
Step 4: On the Upload Media page, click the “+ Choose a file to upload” button and browse for your Zoom recording. This should be an .mp4 file. Typically, these files are located: [your PC] > Documents > Zoom for PC users and /Users/[your user name]/Library/Preferences/Kaltura/Capture for Mac users.
Step 5: The following page will show you the upload progress and allow you to edit the Name, Description (optional) and Tags (optional) for the file. You can choose to keep the video Private or Publish it to one or more of your courses.
Step 6: Click the Save button to continue. (You do not need to wait for the upload to complete to click the Save button, but you will need to remain on the page until the upload is complete.)
Step 7: Once the video has finished uploading and has been saved, you will receive a banner message and links to “Go to Media” and “Go to My Media” will appear adjacent to the Save button. Click on the “Go to My Media” link.
Step 8: Your video should now appear in your media list in your My Media area. It will likely show an “in-progress” image until it has been encoded and is ready to be viewed.