Using My Media in WebCampus
Enable My Media and the Media Gallery in your WebCampus Course
The My Media area in WebCampus allows you to upload video files and share them with your student via the Media Gallery or embed them elsewhere in your course (e.g. quizzes, discussions, modules, etc.). In order to use My Media and the Media Gallery you must first enable them in your course settings.
Step 1: Log in to WebCampus and browse to your course.
Step 2: Click on Settings in the left-hand Course Menu

Step 3: On the Settings page, click on the Navigation Tab.
Step 4: Drag My Media and/or Media Gallery to the top list to add them to your course menu. Alternatively, you can click the three dots adjacent to each item (Edit Course Navigation) and choose “enable.” The order of the top list determines the order these items will appear in your Course Menu.
Step 5: Important: Click the Save button at the bottom of the screen to save your settings. (You may need to scroll down to see the Save button.) It’s easy to overlook this step.
Uploading existing video files to My Media
You can easily upload most common video (and audio) files to My Media in WebCampus. This content can then be deployed in your WebCampus course(s). Since My Media works via a streaming server, any uploaded content must be re-encoded before it will be available. This can take 1-2x the length of the video (this varies depending on video quality as well).
Step 1: Log in to WebCampus and browse to your course.
Step 2: Click on My Media in the left-hand course menu. (If My Media is not in your course menu it will need to be enabled.)
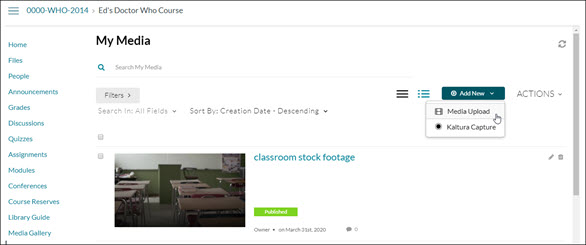
Step 3: On the My Media page, click on the Add New drop-down menu and select Media Upload.
Step 4: On the Upload Media page, use the Drag and Drop area to add your video files or click the “+ Choose a file to upload” button and browse for your file.
Step 5: The next page will show you the upload progress and allow you to edit the Name, Description (optional) and Tags (optional) for the file. You can choose to keep the video Private or Publish it to one or more of your courses.
Step 6: Click the Save button to continue. (You do not need to wait for the upload to complete to click the Save button, but you will need to remain on the page until the upload is complete.)
Step 7: Once the video has finished uploading and has been saved, you will receive a banner message and links to “Go to Media” and “Go to My Media” will appear adjacent to the Save button. Click on the “Go to My Media” link.
Step 8: Your video should now appear in your media list in your My Media area. It will likely show an “in-progress” image until it has been encoded and is ready to be viewed.