How to create a video quiz using My Media (Kaltura Video Quizzes)
Interactive video quizzing with Kaltura (My Media) seamlessly embeds questions at any point in a video. These questions are attached to the video and “travel” with it when paired with an assignment in any of your WebCampus courses. As students watch the video quiz, the questions will appear at the chosen points. The video continues after each question is answered. Various settings allow instructors to choose whether students can repeat viewing, skip questions, revise answers, get hints, and/or discover the correct answers.
Jump to
- Introduction to graded interactive video quizzes
- Note regarding video length
- How to create a video quiz
- Video quiz settings
- How to create a WebCampus assignment for your quiz
- Additional tips and information
- Additional resources
Introduction to graded interactive video quizzes
By embedding questions in a video, online video quizzes can:
- Encourage engagement
- Promote active viewing
- Measure participants’ interest and understanding
- Formally assess comprehension, including through gradebook integration
A video quiz must be paired with an Assignment in WebCampus for the quiz to be graded. Quiz scores can then be pushed automatically to the Gradebook of the course in which you create the assignment. Watch the video below for a quick tutorial on setting up a graded Interactive Video Quiz.
Creating a graded interactive video quiz
Learn how to create an interactive video quiz.
For information on gradebook issues, see the troubleshooting gradebook issues section below.
Continue reading for more information and recommended settings for video quizzes.
Note regarding video length
Video quizzes may not work well with long videos. We strongly recommend using interactive video quizzes with videos 15 minutes or less in length.
Whenever possible, it is best to keep the length of your videos short. If your video content would result in a long video, we recommend that you break down your video content into smaller, more digestible chunks so it can be delivered in smaller, shorter, separate videos. For example:
- A 30-minute presentation could instead be broken down into three separate 10-minute videos.
- An hour-long presentation could be broken down into four separate 15-minute videos
How to create a video quiz
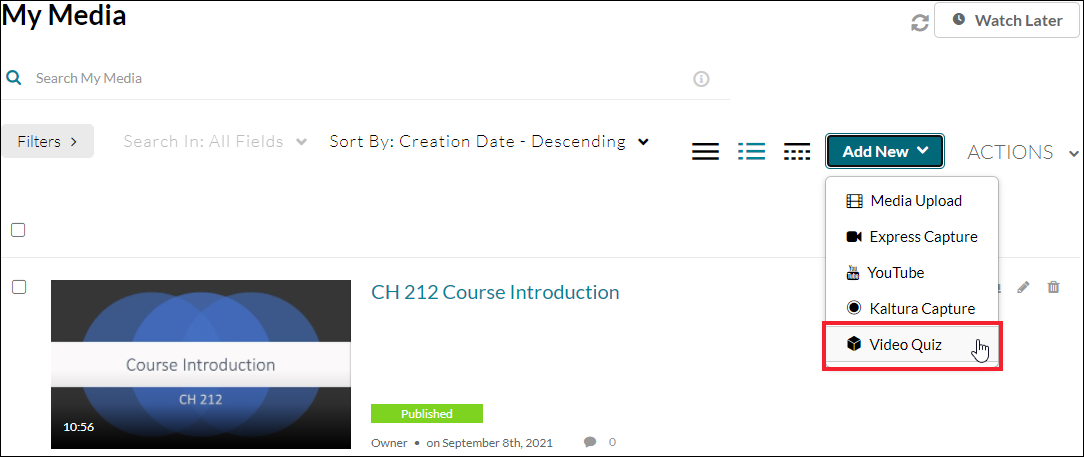
Step 1: Navigate to My Media in your WebCampus course.
Step 2: Click on the Add New drop-down menu and select the Video Quiz option.
Step 3: From here, you can either upload a new video or one already present in your Gallery.
- To upload a new one, click the + Upload Media button in the upper-right.
- To use an existing video, scroll down through the menu and click the Select > button next to the one you want to use for the quiz.

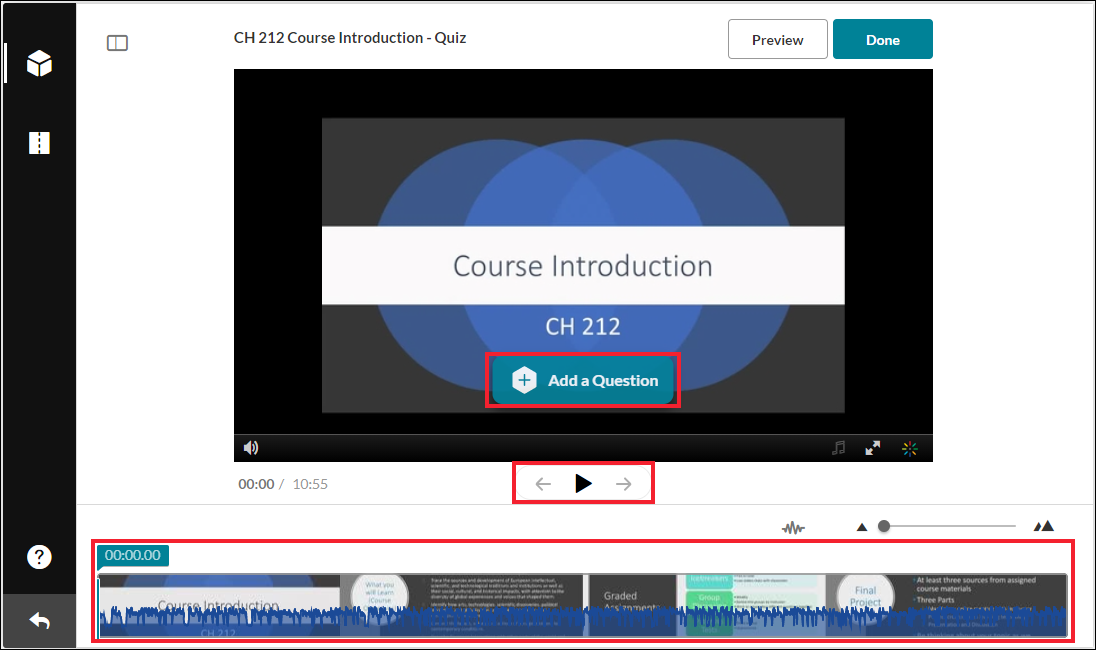
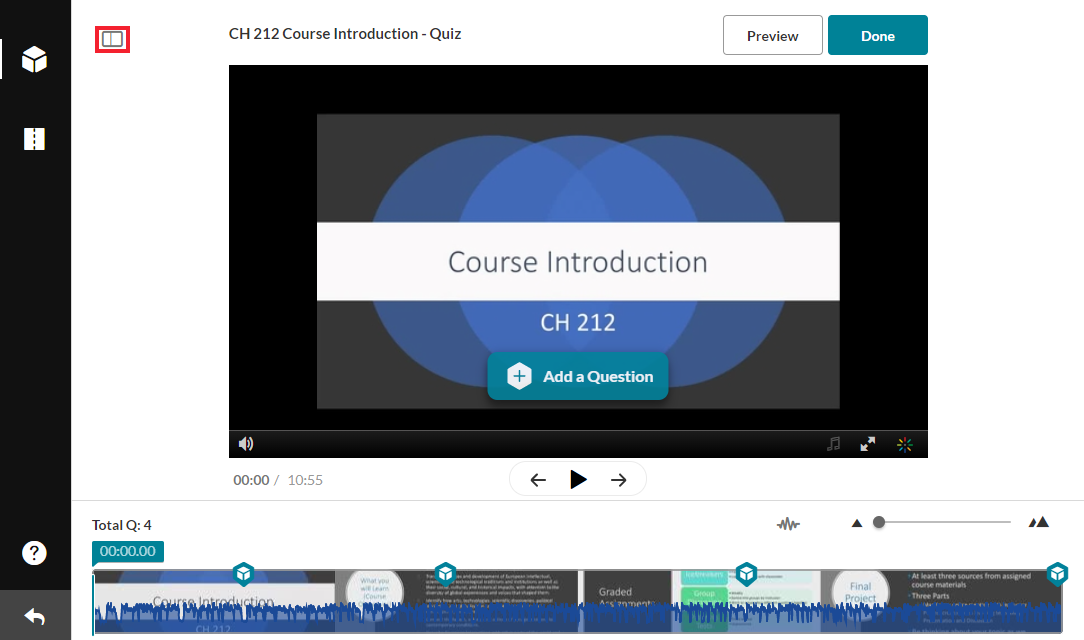
Step 4: After you select a video to use, a window will open where you can begin creating the video quiz. This editor will allow you to edit the description and grading information for the quiz as well as insert questions into the video at intervals using the timeline tool.
Note: This window may take a moment to load, depending on the length of your video.
Step 5: Quiz settings include three primary areas: Details, Scores and Experience.

See the Video quiz settings section below for information regarding the different options.
Step 6: To insert a question into the quiz, either play the video normally and pause where you would like to place it, or grab the highlighted time slider and drag it to the desired location on the video, then click the + Add a Question button.
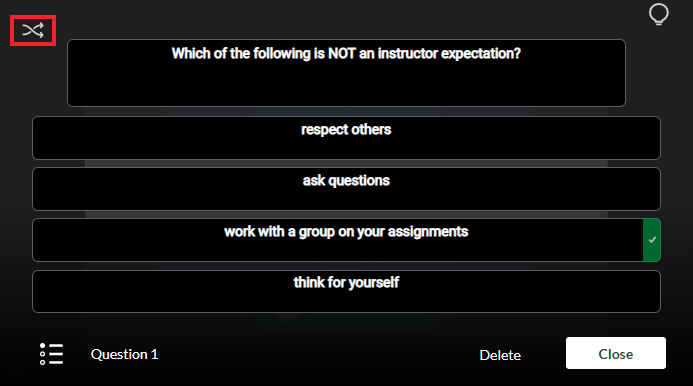
Step 7: Choose which question type you would like to insert into the video.
Reminder: Only Multiple Choice and True/False question types are graded.
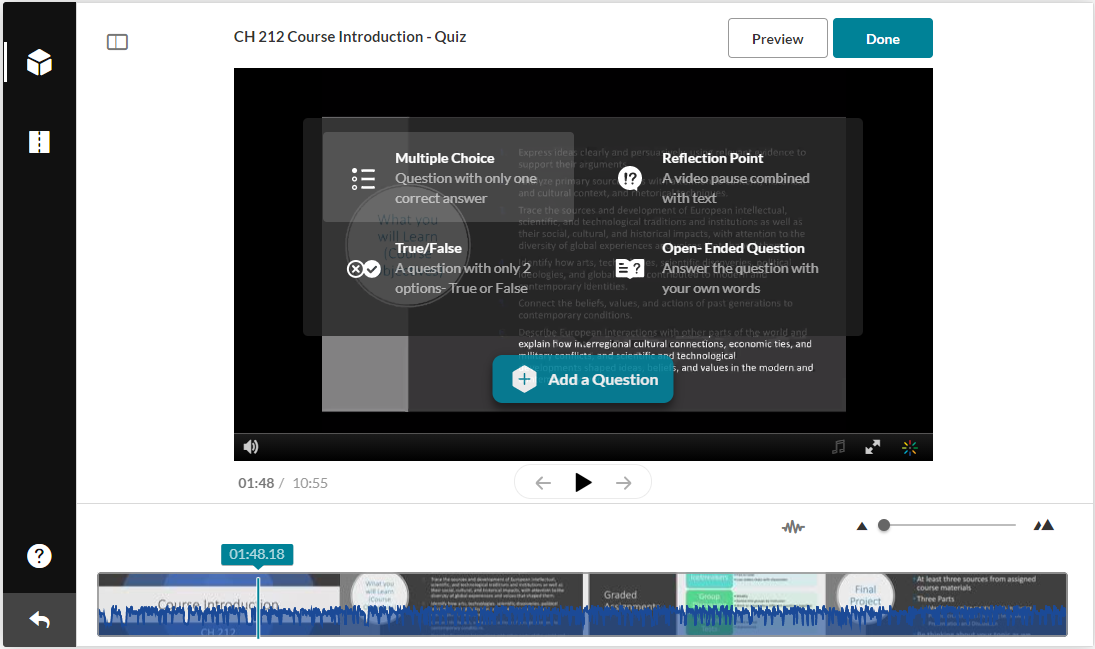
Multiple Choice
Multiple Choice questions allow only one correct answer and up to four answer options. We recommend clicking the Shuffle icon so that the correct answer doesn’t appear at the top. You can also click and drag answer options to reorder them.
True/False
True/False questions allow two answer choices. Open-Ended Open-Ended questions are not gradable and allow students to enter text responses to on-screen questions or prompts.
Open-Ended
Open-Ended questions are not gradable and allow students to enter text responses to on-screen questions or prompts.
Reflection Point
Reflection Points are not graded. They allow you to stop the video and present students with the text of your choice. Students do not provide answers to Reflection Points.
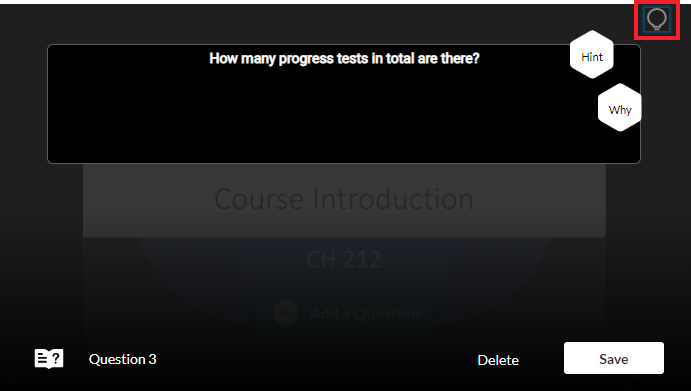
Step 8: You will be taken to a menu where you can edit the question and answers, and include a “Hint” or “Why.” The specific options will vary depending on the question type.
Multiple Choice, True/False and Open-Ended questions allow you to enter a question hint and/or correct answer rationale. Click on the Add a why icon, which looks like a light bulb, on the upper right side of the screen to add text hints and/or explanations to the question.
Step 9: Click the Save button when you are satisfied with the structure of the question. It may take a moment to complete the save process.
Step 10: Once the question is saved, a cube icon will appear on the timeline indicating that a question has been created there. You can click this icon to edit that question. Repeat the process to add additional questions to your quiz.
Step 11: When you are satisfied with the quiz questions and settings, click the Done button in the upper right-hand corner of the interface.
Video quiz settings
You will likely want to determine the settings of your quiz before adding your questions. This is where you will edit the details for your quiz, select scoring options and determine the experience students will be allowed to have with the quiz. If the settings panel is collapsed, you can activate it by clicking on the Expand Panel icon.
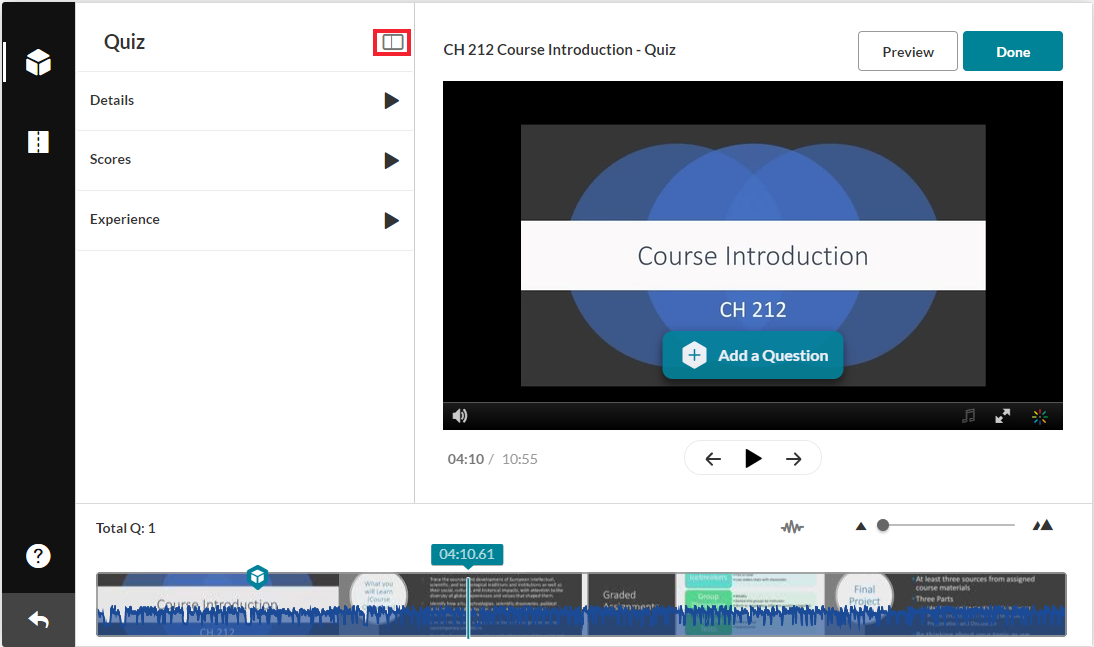
There are three primary areas:
Details allows you to edit the name and description of the quiz. You can also determine whether to add a welcome message and allow students to download a list of the questions and possible answers at the start of the video.
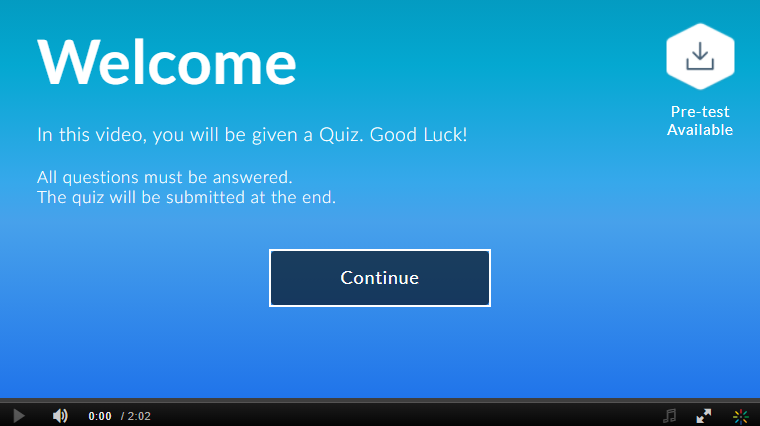
You may consider unchecking Instructions and including your own custom instructions under the Welcome Message.
Scores determines whether students will be allowed multiple attempts and whether they will be able to see their scores and the correct answers after completing the quiz.
If you choose to allow multiple attempts, consider unchecking the Include Answers option so that students are not given the answers before retaking the quiz.
Experience allows you to edit other settings, including allowing users to:
- Change answers
- Skip questions
- Seek forward
How to create a WebCampus assignment for your quiz
Your video quiz is now available in your My Media repository. However, it is not available to students yet; it can be deployed in any of your WebCampus courses, much like the other media in your My Media repository. To set up a video quiz to automatically report grades to your Gradebook, you will need to pair it with a WebCampus Assignment. Follow the directions below to link your video quiz to an assignment in your course.
Step 1: Go to assignments in your WebCampus course.
Note: Video quizzes are created as assignments, not quizzes.
Step 2: Click on the + Assignment button to create a new assignment.

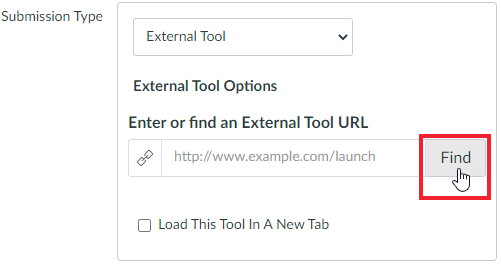
Step 3: Under Submission Type, select External Tool. Click the Find button.
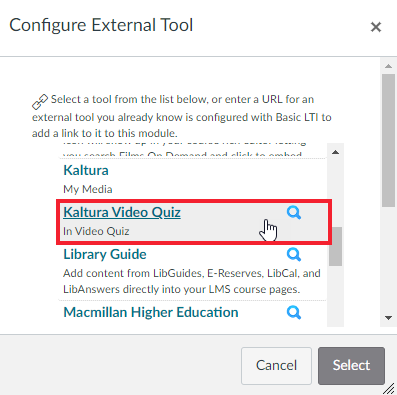
Step 4: Scroll down until you see Kaltura Video Quiz and select it.
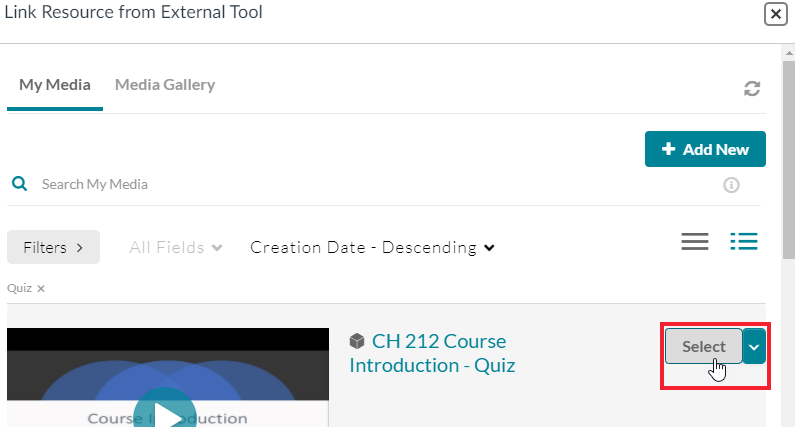
Step 5: Your My Media page will load in a small window with all of your available video quizzes. Click the Select button adjacent to the video quiz you want to use.
Step 6: You will be brought back to the Configure External Tool window. Click the Select button to confirm your choice.
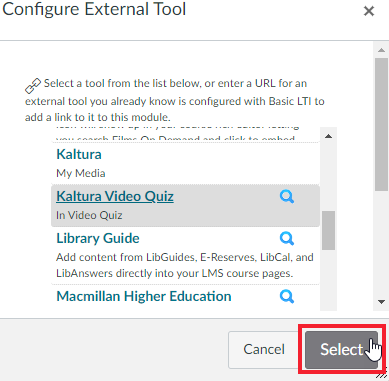
[Figure 15] Screenshot of the Configure External Tool pop-up window. The Select button is highlighted.
Step 7: Edit the remaining settings for your assignment. Make note of the Points field, directly below the Rich Content Editor. This is where you will determine the point value of your quiz.
Please note: The video quiz will treat each gradable question* (Multiple Choice and True/False questions) as equal in value and will divide the total point value for the quiz by the number of gradable questions. It is not possible for one gradable question to be worth more points than another.
Student scores are posted immediately to your WebCampus gradebook when they successfully submit the quiz.
*Open-Ended questions and Reflection Points are not considered gradable items and will not be counted in your students’ quiz scores.
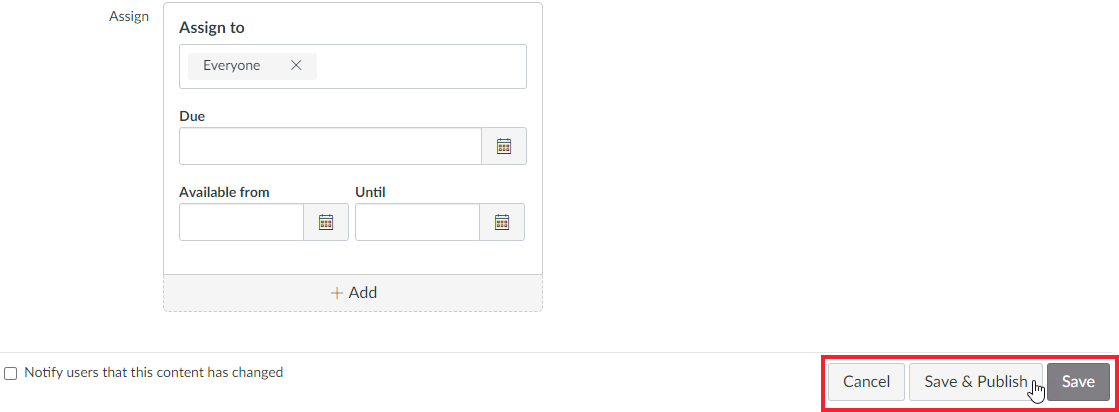
Step 8: Click the Save & Publish or Save button when you are finished editing the settings for your assignment.
You have now successfully created a video quiz in your course, and student scores will automatically be recorded in the WebCampus gradebook when they submit the quiz. Your video quiz will be available under the Assignments tab in WebCampus (not under quizzes) and can be added to a course module.
Additional tips and information
Tips to help students
The instructions below may be helpful to provide to your students.
Avoid playing the video at a speed faster than 1.0x. Doing so may cause questions to be skipped and missed.
When selecting an answer, click on the answer and then click the Select option. The box will turn gray and read “selected” and you will see the Continue button appear at the bottom right.

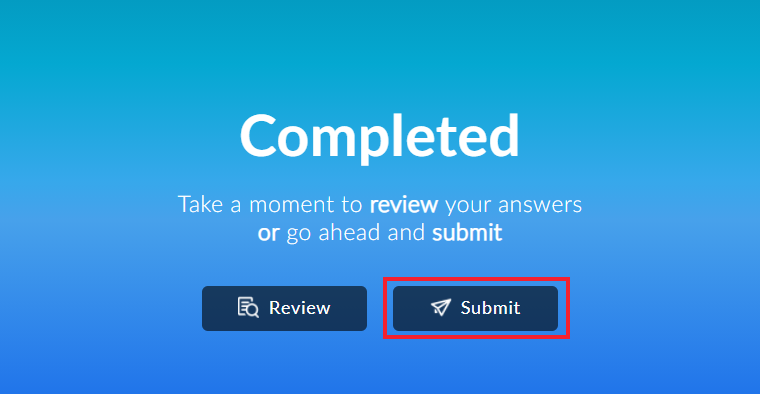
When viewing a Reflection Point (a question with no answers), click the Continue button to continue video playback. Once you’ve completed the video, a “Completed” screen will appear, however the quiz has not yet been submitted for grading. Make sure to click Submit to successfully submit your responses.
Editing a video quiz
You may find that you need to return to a video quiz to edit its settings. To do so, click on My Media in your WebCampus course, click on the video quiz in your list of media, click on the ACTIONS drop-down menu and select Launch Editor.

You may need to activate the settings menu to edit the quiz settings. Click the Expand Panel icon in the upper left side of the window.
A note about editing a video quiz
Before editing a video quiz, consider these two options/recommendations:
- Edit a quiz if you have a hard-to-understand question that students are struggling with, or if you no longer wish to use that question.
- Copy a quiz if you want to use a new version of the quiz for future semesters.
Analytics are for the lifetime of the quiz and you may prefer viewing analytics specific to the course or semester. (See the next section on “Viewing the analytics” for more information.)
Troubleshooting gradebook issues
Graded video quizzes are designed to record grades in the WebCampus gradebook automatically. However, there are some ad blockers and other software that students may have installed that will prevent this process. If a student has taken the quiz but there isn’t a grade in the gradebook, you may find the response data and grade under the quiz analytics. See the next section “Viewing the analytics” for more information.
Viewing the analytics
Viewing the analytics of your video quiz is similar to viewing the analytics on other media in your My Media repository. You can access it by clicking on the View Analytics icon next to the video or by clicking the video link or thumbnail in My Media, then choosing the drop-down arrow next to Actions and selecting Analytics.

On the analytics page, you will have many options to view data including:
- Video Analytics
- Quiz Questions
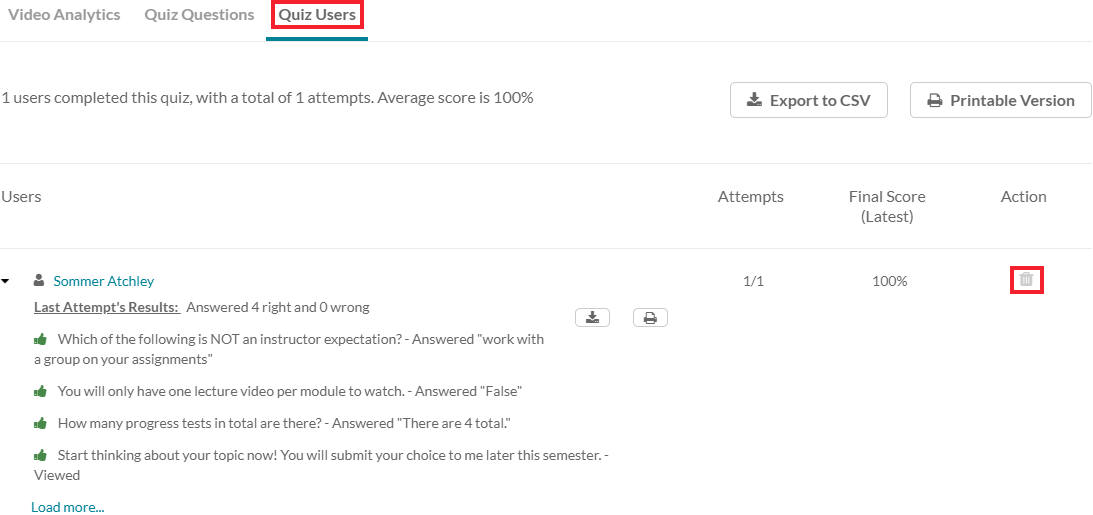
- Quiz Users
The analytics for interactive video quizzes can be a great way to gain insight into how your students are using the video.
A note about using analytics for attendance
We don’t recommend using the analytics for attendance. Certain browsers and security software make analytics for certain users unavailable.
Also note that analytics are for the lifetime of the quiz. If you reuse the quiz in an assignment for a later semester, the analytics carry over and apply to all users. If you want analytics only for a certain course or semester, you will need to make a new quiz (or new copy/version of the same quiz with a new name) and use it for the new course or semester assignment. If you have NOT done this and a student repeats a course, the student may not be able to retake the quiz unless you manually reset the student’s submission.
Resetting a submission
There may be circumstances in which you need to reset a student’s submission, including technical issues or a student needing to repeat your course (when you’re reusing a video quiz in subsequent semesters instead of making a new copy). Navigate to the video quiz analytics page and click on Quiz Users at the top. Find the user you need to reset and click the Delete icon under Action.