Creating a video assignment in WebCampus
Creating video assignments in WebCampus
You can use WebCampus to collect video assignments. You can then use SpeedGrader to view and grade the video submissions. Use the instructions below to set up a video assignment in WebCampus.
Step 1: Log in to WebCampus and browse to your course.
Step 2: Click on Assignments in the Course Menu.
Step 3: Click on the + Assignment button to create a new assignment.
Step 4: Enter a name for the Assignment in the “Assignment Name” field.
Step 5: Use the text editor to add any instructions for the assignment.
NOTE: Student instructions on how to turn in a video assignment are available for you to distribute to your class from Teaching & Learning Technologies. Contact the Teaching & Learning Technologies for more information.
Step 6: Enter the point value for the assignment, assign an Assignment group if needed (by default it will be in “Assignments”) and choose how the grade will be displayed.
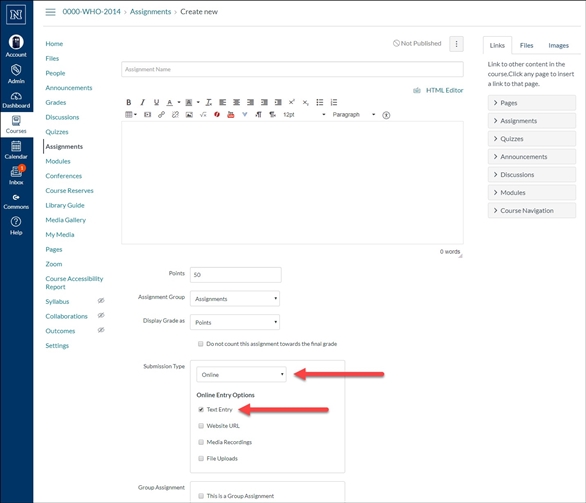
Step 7: Under “Submission Type” select Online and check the box next to Text Entry. Do NOT select Media Recordings or File Uploads.
NOTE: Using this method allows you to view the videos online without having to download the videos to your computer and resolves most format issues that could cause technical problems with video file formats.
Step 8: Check the boxes next to Group Assignment and/or Peer Reviews, if appropriate for your assignment.
Step 9: Under “Assign” select to whom you would like to give the assignment as well as any availability & due dates. If not specified, it will be assigned to everyone in the course class. If you need to assign to multiple groups or increase time as an accommodation, etc. click the “+ Add” button to specify to whom and adjust availability or due dates.
Step 10: Click the Save & Publish button (or just the Save button if you do not want the assignment to be published at this time).
NOTE: This assignment setup will work with video files students create outside of WebCampus (i.e. SmartPhones, other software applications such as Zoom or Adobe Premier) and videos created with Kaltura Capture. Kaltura Capture is the webcam/screen recording software that is part of Kaltura. See the TLT‘s Kaltura Capture resources for more information.
Using video from My Media in WebCampus Discussions
Videos can also be used with Discussions in WebCampus. Instructors can post videos for the class to review and discuss, and students can submit videos - both with initial posts and replies. Discussions can be a great tool for reviewing video content. Allowing multiple students to comment and reply to others’ comments. More information on using Discussions in WebCampus can be found on the Canvas Guide.
Step 1: Log in to WebCampus and browse to your course.
Step 2: Click on Discussions in the left-hand Course Menu.
Step 3: Browse to the discussion post where you would like to add the video or create a new discussion. See Canvas Guide on Discussions for details.
Step 4: Click on Reply (or the + Discussion button for a new Discussion).
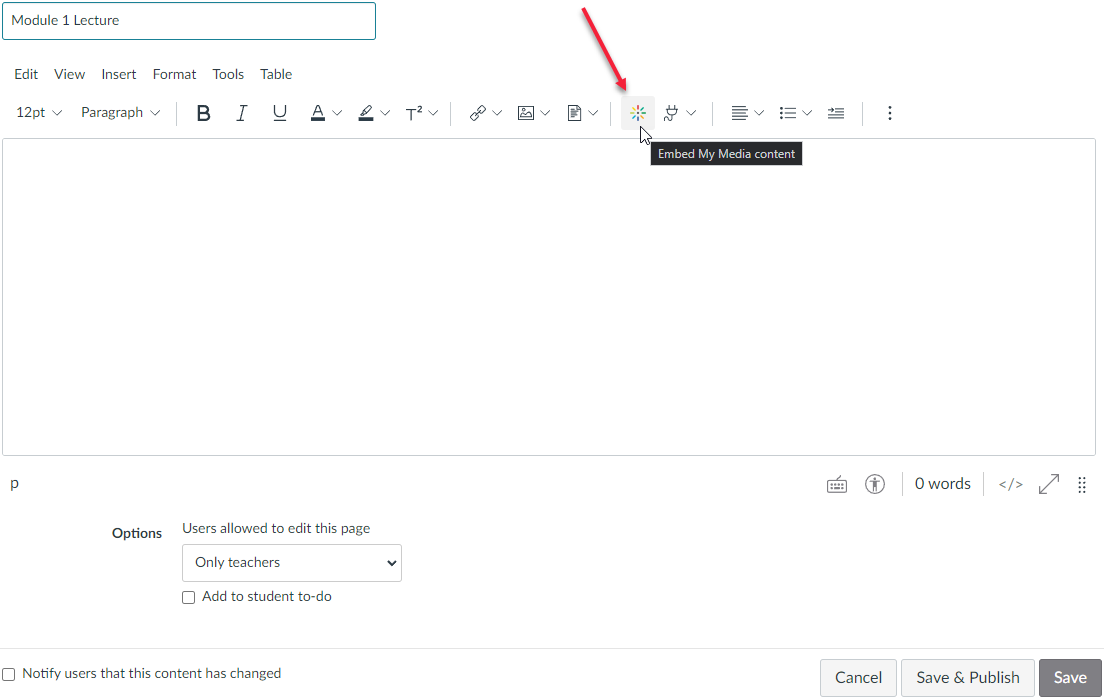
Step 5: Click the Embed My Media content icon on the text editor tool bar to add your video.
Step 6: In the window that opens, select existing content in your My Media by clicking the Select button adjacent to the video or upload a new video by clicking the + Add New button.
Step 7: The video will embed in the text editor.
Step 8: Click the Save button to save your work or click the Save & Publish button to save your work and make the discussion available to your students.