How to access & use the Rosalind storage system
Before you begin – general access information
The current Rosalind storage platform is at maximum capacity, and we are no longer able to onboard new users or accommodate any quota increases.
- Rosalind can support a maximum single file size of 4TB.
- This storage environment is available on the University of Nevada, Reno campus networks only.
- In the response email from the University TeamDynamix ticketing system, you should have been given the name of your share folder and the path to that folder. Please have that ready so you can complete the instructions on connecting to your share below. Substitute all instances of yourFolderPath below with the path to your share folder.
- If you encounter problems connecting with your desktop client, we recommend starting with your local IT support personnel for assistance.
MacOS instructions
To connect to the Rosalind storage resource, macOS users should use the Finder application to configure the connection. These instructions were generated from a system running macOS 11.4 (Big Sur), but should work with any current, supported Apple operating system.
- From the dock, select the Finder app.
- Using the Finder menu, select Go – "Connect to Server" (or use CMD+K).
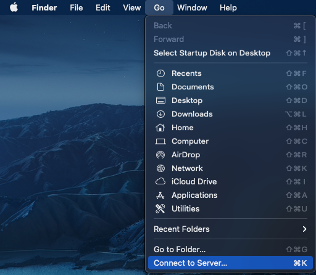
[Figure 1] The Finder menu bar has the Go dropdown open and "Connect to Server..." highlighted. - The Connect to Server interface will start. Please enter the Rosalind resource like so: smb://rosalind.unr.edu/yourFolderPath
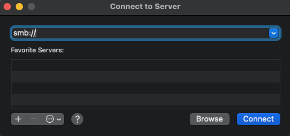
[Figure 2] The Connect to Server interface for Finder. An unnamed server selection field is populated with "smb://". - Log on with your University NetID username and password. You may save this in the macOS keychain, but be aware that when you reset your NetID password you will need to update your keychain password or the connection will fail.
Linux instructions
Access through CIFS
Linux users can access their home and shared directories through the CIFS (Microsoft Windows Share) protocol. This can be done using GUI tools such as Nautilus and Caja or the command line.
Using Nautilus or Caja
- Start the file manager application from the applications menu of your Linux distribution, or click on the file manager icon on the desktop. When you open Nautilus or Caja, choose "Connect to Server..." from the File menu.
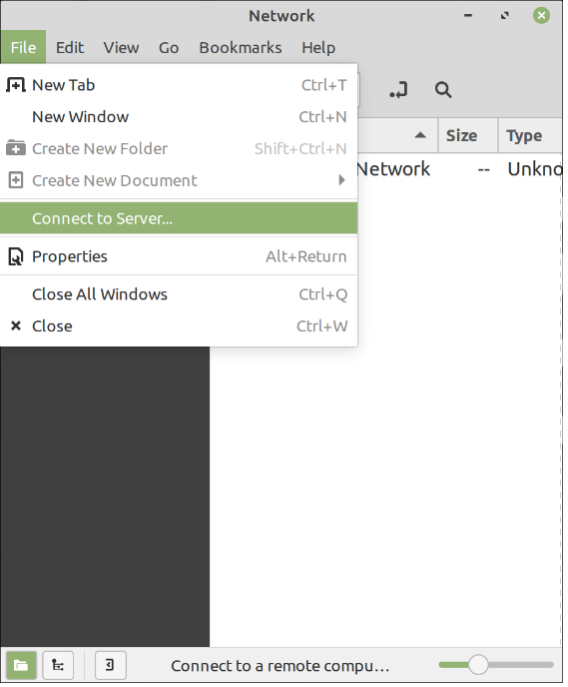
[Figure 3] The Linux file manager has the File dropdown open from the taskbar, with the option "Connect to Server... highlighted. - In the Connect to Server dialogue box, use the following server details:
- Type: Windows share
- Share: yourFolderPath
- Folder: /
- Domain name: unr.edu
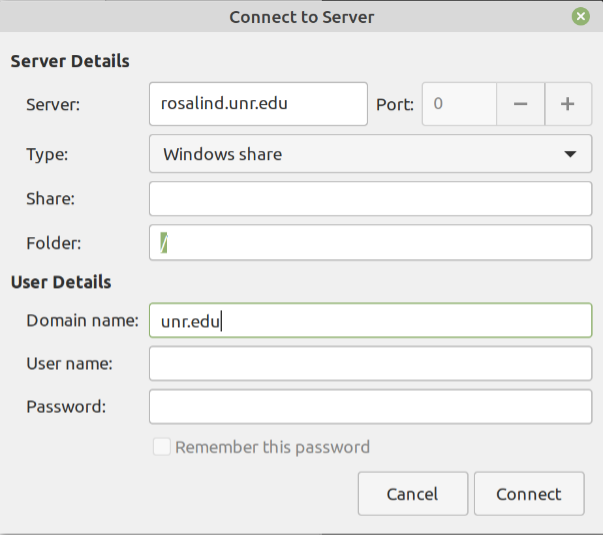
[Figure 4] The Connect to Server interface for the Linux file manager. Under Server Details, the Server field is populated with "rosalind.unr.edu" with the Port field grayed out and set to "0". The Type field has "Windows share" selected. The Share field is blank, while the Folder field is populated with "/". Under User Details, the Domain name is populated with "unr.edu", while the User name and Password fields are blank.
Mounting a Windows share using the terminal
You can also mount a Windows share. You will need root or sudo permissions.
- Create a local directory to mount the remote system. Some suggestions are "/mnt/cifs" and "/home/$username/cifs".
- As the superuser, run mount with the following parameters:
- sudo mount -t cifs //rosalind.unr.edu/yourFolderPath/$netID -o username=$netID,domain=unr.edu,uid=$username
You can also mount these directories permanently using autofs or fstab. Please see your distribution documentation for installing autofs. Sample setup details for mounting these directories through autofs and fstab are below.
- A sample command for autofs:
- users –fstype=cifs,rw,noperm,credentials=/home/$username/private/credentials.txt ://rosalind.unr.edu/yourFolderPath/$netID
- A sample configuration line for fstab:
- //rosalind.unr.edu/yourFolderPath/$netID /mnt/cifs cifs noperm,_netdev, credentials=/etc/secure/credentials.txt 0 0
Ensure that the credentials.txt file is not world readable.
Microsoft Windows instructions
These instructions were generated from a computer running a 2019 update of Windows 10.
- Navigate to the task bar and click on the manila folder icon to launch Windows Explorer. You may also use the keyboard shortcut Windows+E.
- Navigate to the "This PC" entry in the left-hand bar.
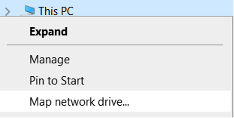
[Figure 5] In the left-hand bar of Windows Explorer, This PC has been selected. Its right-click context menu is open, with "Map network drive..." highlighted. - Right-click the "This PC" entry and choose "map network drive".
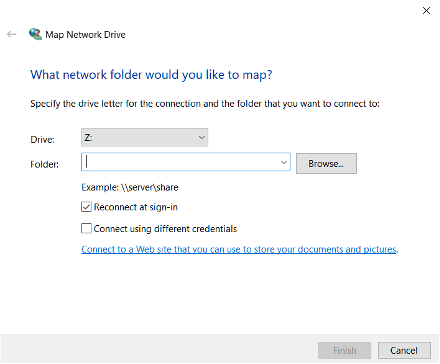
[Figure 6] The Map Network Drive interface for Windows Explorer. The Drive field has the "Z:" drive selected, while the Folder field is blank. The checkbox "Reconnect at sign-in" is ticked, while the checkbox "Connect using different credentials" is unticked. - Choose the drive letter you would like to use and enter the folder path as follows: "\\rosalind.unr.edu\yourFolderPath"